Monday, September 01, 2008

StockSample: Simple Binding

In Windows Forms land, it is easy to just use the existing capabilities of the Forms Designer in order to set up the bindings in the View.  It would be nice to use this functionality on the model end of things, too.  The problem, however, is that the sole purpose of the System.Windows.Forms.Binding class seems to be to bind a property to a control’s property.  What we need is a simple way to bind two properties together.
The SimpleBinding class (StockSample.Core.Framework.SimpleBinding) is based on an article from CodeProject: Understanding Simple Data Binding by Marc Clifton.  Here is the usage pattern we’re looking for:
   1:  SimpleBinding.Bind(obj1, "Property1", obj2, "Property2");

This statement will bind obj1.Property1 to obj2.Property2.  In terms of garbage collection, the Bind method will link the two objects together so that they will have the same lifetime.  In some cases, this is not desirable and we may want to look into using WeakReferences in the binding.  This makes the code more complicated, but will help in cases where we want everything coupled a lot more loosely.
This example statement, however, is not what is actually in the source code right now.  I added an extra parameter of type ISynchronizeInvoke that is called “affinity”.  This parameter can be null if you don’t care about affinity (I’ll add an extra method overload to make it look prettier later).  Affinity in this case refers to thread affinity.  This is very important when binding to UI components because if you make any calls into Windows Forms, you have to make those calls on the thread that created the handle for the controls. 
Whenever you want to make a call into the UI (or potentially make a call into the UI), you want to follow this pattern:
   1:  void DoSomething()
   2:  {
   3:      if (affinity != null && affinity.InvokeRequired)
   4:      {
   5:          affinity.BeginInvoke(new Action(DoSomething), new object[0]);
   6:          return;
   7:      }
   8:   
   9:      // action to perform...
  10:  }

You could easily substitute Action for an anonymous delegate or some other construct that makes sense.  The most important line there is line 6, if you don’t return, then you’ll end up falling through and executing the code anyway. 
Looking at the Control type, you’ll see that it implements ISynchronizeInvoke.  Once the internal handle for the control is created, you can use Control.Invoke and Control.BeginInvoke to post messages on the UI thread’s message loop to execute delegates.  Invoke will wait until the message is processed before returning.  BeginInvoke will post the message and return immediately.  Unlike calling BeginInvoke on a delegate instance, calling Control.BeginInvoke will not post anything into a thread pool, it uses the message loop.  Moreover, if the control handle hasn’t been created yet, this method will fail.  The safe bet is to find the topmost container for the control and use it as your ISynchronizeInvoke reference.  This will make it more likely that the handle has been created.  You can even call Control.CreateHandle to force the handle to be created in a more timely manner.
Now that we know why there’s a fifth parameter in the SimpleBinding.Bind method, we should discuss what the method actually does:
  • Get information about the properties being bound (using reflection).
    • Some properties may not have setters, some properties may not have getters.  This implicitly establishes if the binding is two-way or one-way.
    • We can only bind the properties that we have access to.  If you can’t call the getter or setter from your code, then you can’t bind to it.
  • Figure out how the property change is triggered.  Right now, the SimpleBinding supports three types of triggers (technically two, but I guess “no trigger” could be construed as a type of trigger… or lack thereof).
    • INotifyPropertyChanged: if the object implements this interface, then the SimpleBinding will subscribe to the PropertyChanged event and use that to trigger the synchronization.
    • PropertyNameChanged event: This is a pattern that is evident in Windows Forms as well as in other places.  In .NET 1.1, there was no INotifyPropertyChanged interface to implement.  If the object does not implement INotifyPropertyChanged, then the SimpleBinding will use reflection to find an accessible event named PropertyNameChanged.  For example, to look for the change in the “Text” property, we look for an event called “TextChanged”.
    • No trigger: If the SimpleBinding can’t find any of the other triggers, then it just won’t bother with trying to figure out when the property changes.
  • Force synchronization from obj1.property1 to obj2.property2.
    • The convention is that the left property is pushed to the right.  If everything is set up ok, then these two should be synchronized.
    • A more complete binding will check to see if the binding is one-way and which direction it should go before forcing synchronization.
Now we know when a property changes and which thread we need to call getters and setters on.  However, we’re missing the key part of binding, actually performing the synchronization.
In the current version of the SimpleBinding, I take the naive approach and assume that the types are the same.  This is VERY naive and is totally unrealistic, but will work for the time being.
   1:  // precondition: _prop1get != null && _prop2set != null
   2:  object value = _prop1get.Invoke(_object1, new object[0]);
   3:  _prop2set.Invoke(_object2, new object[] { value });

This code will definitely throw an exception if the property types don’t match up.  It would be totally great if there was some pattern or functionality in the .NET Framework that would help us arbitrarily convert types and add new type conversions as needed.  Luckily, such a thing exists: IConvertible.  All the basic types in .NET implement this interface and we can make the following adjustments:
   1:  object value = _prop1get.Invoke(_object1, new object[0]);
   2:  value = Convert.ChangeType(value, _prop2.PropertyType);
   3:  _prop2set.Invoke(_object2, new object[] { value });

This is a simple change (I got rid of the comment though, the precondition is the same as the code snippet above).  Convert.ChangeType will “do the right thing” or throw an exception if the cast is not valid.  If you don’t want an exception, you can add the appropriate try/catch and deal with it however you see fit.
The SimpleBinding is just that, simple.  It definitely has a lot of room for growth and extension.  I purposely made it simple and not very extensible.  If someone wanted to really make a flexible binding system, then a pipeline type approach might work.  In this way, you can insert a sequence of operations that will be performed when the binding is initialized and when the triggers are hit.  The other problem is the strong references between the two objects that are being bound.  These are not insurmountable issues and it is not SimpleBinding’s job to solve them all.  SimpleBinding is a pattern that I like to follow and it can be adapted to different situations and changed to fit the needs of the application.  I find it very useful to be able to use one line of clear code to keep two properties in sync.
Technorati Tags: ,,

Friday, August 22, 2008

StockSample: The View

This post is part of my series on the Windows Forms Model View Presenter with Data Binding sample program I wrote I call StockSample.

In the 20080818 snapshot of the StockSample program, I have a shell program (the main form) and a single view that is in a module called “StockLister”.  I’m using some of the same terminology from CAB (Composite UI Application Block).  The StockSample program doesn’t use anything other than the .NET base class library (and NUnit and DockPanel Suite).  An application such as this might be better hosted on something like CAB, or you can develop your own simpler framework that is specific to your application.  The benefit of going with an application framework that’s already developed is that (1) you don’t have to do it yourself and (2) you can more easily talk to someone else about your application.  For something that will be developed and maintained by multiple developers over time, using something like CAB might be easier to get them trained up since they can troll the Internet for documentation and starter examples.

The module and the view represent a feature (or set of features) that tell a story (or part of a story).  The view is what the user sees and interacts with.  Most applications will have at least one view for the user to interact with.  In the StockSample program, the module is called “StockLister” and its purpose is to allow the user to see all the stocks that are available, their prices, and the timestamp of the last price update.  The view interface IStockListerView is very simple:

   1:  public interface IStockListerView
   2:  {
   3:      IStockList Stocks { get; set; }
   4:  }

It accepts the interface reference to the IStockList we have in the model.  For this simple example, I made it so that the view can consume the model interface directly without modification.  In a more complex application, you may need to map the model data into the view data in different ways (this is handled by the Presenter which I will discuss in a later post).  For now, we will work with the simple example.  Notice that there is no reference to anything in WinForms or ASP.NET.  This view interface is a contract for a particular feature of the application (in this case, allowing the user to see a list of stocks with updated prices).

In the StockSample, this view is implemented as a WinForms UserControl.  Here are the steps I took to build this control:

  1. In Visual Studio, create a new UserControl and call it “StockListerControl”.
  2. Make the control area bigger and drop a DataGridView on it.  Set the DataGridView DockStyle to Fill.
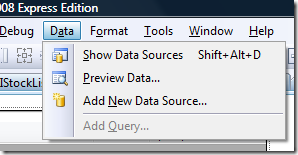
  3. Click on the “Data” menu, then click “Add New Data Source…”.
    Add New Data Source option in Visual Studio
  4. Select “Object”, click “Next”.
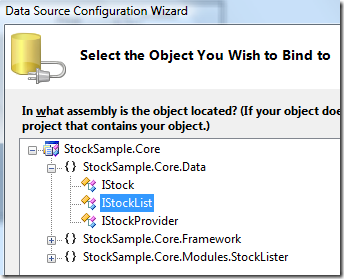
  5. Drill down the tree (this tree is built from the classes in the project and external references) and select the “IStockList” interface.  Click “Next”.
    Where to find the IStockList data object to bind to
  6. Click “Finish”.
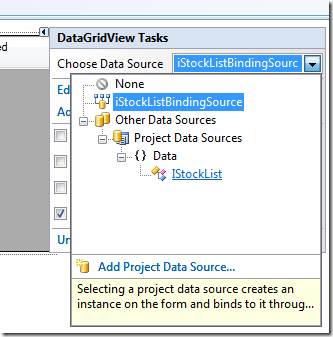
  7. Now, click on the DataGridView, then find the “Smart Tag” in the top right (the little white box with the black chevron), click it, then click the drop-down that says “Choose Data Source”.
  8. Drill down into “Other Data Sources”, “Project Data Source”, through a namespace or two, then click “IStockList”.
    Where to select the IStockList data source for the DataGridView
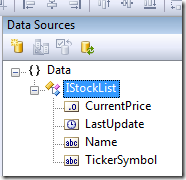
  9. The grid should be pre-populated with all the properties of IStock.  Based on how I wrote the interface for IStockList, Visual Studio figured out that this is a list of IStock objects.
    VisualStudioIStockListDataSourceDescription
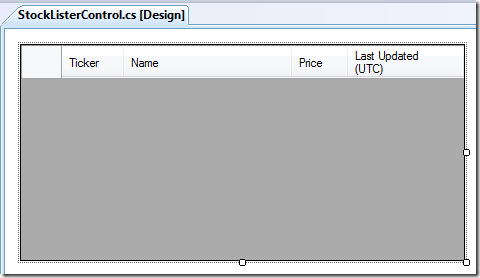
  10. You can edit the grid columns to change the titles, data format, and ordering of the columns to make it look pretty.
    VisualStudioStockListerControl
  11. You’ll notice a new component added to your UserControl at the bottom of the screen, I renamed it to “iStockListBindingSource” to look nicer.

Now that we have the control created, we write a little bit of code:

   1:  public partial class StockListerControl
   2:      : UserControl, IStockListerView
   3:  {
   4:      public StockListerControl()
   5:      {
   6:          InitializeComponent();
   7:      }
   8:   
   9:      StockSample.Core.Data.IStockList _stocks;
  10:   
  11:      public StockSample.Core.Data.IStockList Stocks
  12:      {
  13:          get     {  return _stocks; }
  14:          set
  15:          {
  16:              if (this.Stocks == value) return;
  17:   
  18:              _stocks = value;
  19:              iStockListBindingSource.DataSource = _stocks;
  20:          }
  21:      }
  22:  }

The only meat here is line 19.  The “iStockListBindingSource” is what was created when we added the data source to the grid.  The Forms designer already connected the grid to the binding source, now we just need to supply the data source to the binding source to feed to the grid.  Due to the way we implement the model (using BindingList<T>), we get list update events for free.

At this point, all we’d need to do to show a simple form with just this control is to drop the control on a form, create an instance of the stock list, and pass the IStockList reference to the control.  Coincidentally (or not), that is exactly what the Presenter does.

The Visual Studio Forms Designer has a lot of easy to use features for data binding.  You can perform your own experiments on object data sources in Windows Forms applications.  It makes it super easy to create a functional prototype application as well without touching a database.  At work, I took half a day to create a fairly functional data driven application and not have to write a bunch of UI code.  Most of the work was spent creating the Model layer, then throwing a UI together and wiring everything up was a snap.

Technorati Tags: ,,

Monday, August 18, 2008

StockSample: The Model's Interfaces

This post is part of my series on the Windows Forms Model View Presenter with Data Binding sample program I wrote I call StockSample.

One of the big things that is enabled by following the Model View Presenter pattern is "persistence ignorance".  For the model, I like to have POCO (Plain Old CLR Object) classes that represent the logical model that makes the most sense for the application.  This logical model might be different from the physical model if it makes the application easier to write.  Each of the model objects will also implement an interface that covers all the relevant publicly accessible properties, methods and events on the model types.  Interfaces will help with testability during development as you can create simpler test classes or use a mocking framework to create the desired test behavior.

In the current StockSample snapshot (20080818), I have one model, the Stock.  It has the following interface:

   1:  public interface IStock
   2:  {
   3:      string Name { get; }
   4:      string TickerSymbol { get; }
   5:      decimal CurrentPrice { get; }
   6:      DateTime LastUpdate { get; }
   7:  }

The Stock is special in that most of the application will not be modifying the stock information, but will be listening to changes to the stock.  I didn't make this interface inherit from INotifyPropertyChanged because the model class could use an alternative trigger for property change notifications (PropertyNameChanged events, for example).  The stock information will be populated and updated by the IStockProvider:

   1:  public interface IStockProvider
   2:  {
   3:      IStockList Stocks { get; }
   4:  }

Now that I think about it, I suppose a better name would be StockListProvider, I'll have to make those tweaks later.  The IStockList represents a collection of IStock objects:

   1:  public interface IStockList : IBindingList
   2:  {
   3:      IStock CreateNew(string tickersymbol, string name);
   4:      void Add(IStock stock);
   5:      IStock FindByTickerSymbol(string tickersymbol);
   6:      new IStock this[int index] { get; }
   7:  }

This interface has some more meat to it.  I inherit from IBindingList because I want to make sure we can bind this collection.  IBindingList is a bundle of interfaces that is necessary for binding a collection to places where a DataSet or DataView would typically go.  I'll go into more details about this later.

So, when dealing with the Model layer looking purely at the interfaces, we start with an IStockProvider.  The implementation of this is not important, all we care is that it provides is with an IStockList.  This list contains all the IStock instances that we will be able to use in our application.  The implementation of the IStockProvider will allow us to determine how we will actually get updated stock information.  The IStockList will tell us how many stocks there are and allow us to iterate on the list, and finally, the IStock will give us information on the stocks themselves.

Technorati Tags: ,,

StockSample: First Model View Presenter Sample Posted

After a long hiatus, I've created a new sample program for Windows Forms Model View Presenter pattern with data binding.  This example is not what I would call "best practices" but rather a simplification of the concepts to break it down to the most basic components.

The example is a program that is used to get stock price updates.  I wanted an example that I could do a lot of different visualizations and views / operations that just about anyone can understand.  I know that Glenn Block posted on the Composite UI WPF guidelines here (http://blogs.msdn.com/gblock/archive/2008/07/03/composite-application-guidance-is-live.aspx) and they also have a stock trading reference application.  The goal of my sample is to show a very simple example of Model View Presenter with Windows Forms and data binding.  There is no Inversion of Control container, no database, and no extra frills.  The sample is done in Visual Studio 2008 Express Edition (which is all you need to build / run it).  The only external libraries that are referenced are NUnit (http://www.nunit.org) and Weifen Luo's DockPanel Suite (http://sourceforge.net/projects/dockpanelsuite/).

You can get the source from my google code project here, see this link for instructions on checking out code from my repository (http://code.google.com/p/garoyeriazarian/source/checkout).  The code is in the StockSample/tags/Snapshot20080818 folder.  I'll be updating the trunk periodically with extra functionality.  There are some tests... I'm still trying to get the hang of Test Driven Development.

I'll have a series of posts following talking about parts of the sample and as I build more onto it, I'll talk about those and link to the new snapshots.  You can then use your favorite Subversion client to see what exactly is different.  If you have any specific requests on things you want to see, let me know and I'll try to work it into the sample.

Technorati Tags: ,,